The rigging process - Part 2 - Building a custom rig
In the last post ‘Rigging – Part 1’ I have concluded
that the basic biped rig system 3DS Max has to offer is not suitable for this
type of project, so I’ve decided to build my own custom rig (skeleton). Doing
so has several advantages over using the pre-set rig, such as the ability to
assign custom controllers, custom IK and FK chains, constraints and more.
Using
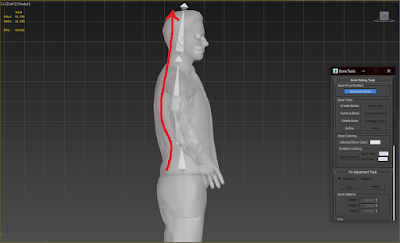
the ‘Bones’ systems tool, I have first created the body skeleton of the model starting
with the first spine bone and moving up towards the head. Although you can have
as many as 6 spine bones in total, during my research I have found out that 3
spine bones are usually enough for animating a human character model, such as
mine. As such, I have given the spine a realistic curvature that follows the
posture of the model, as it will help with setting up the IK chains at a later
point. I did not forget to accurately name each separate bone as every ‘individual
body part must be named for formal understanding and recognition in the
subsequent steps’ (Bhati, Waqas, Karbasi, & Mahesar, 2015). For that, I have used the 'Rename Objects' tool available under the 'Tools' menu.
The
pelvis bone was the next to be created, keeping in mind that the bone needs to
be facing downwards, opposite to the upwards direction of the spine bones. That
is because in animation, much as in real life, the pelvis is closest to the ‘centre
of gravity of the human body’ and also ‘it is the centre of weight distribution
for the entire body’ (Maestri, 2016). Therefore, the pelvis bone is the root of
the rig.
 |
| (Mirrored leg with flipped bones) |
Moving
on, I have structured the left leg of the model with the thigh, knee, ankle and
toe bones. I kept in mind that the knee bone should be always bent to the back
a little, in order for the IK solver (that will be applied later) to allow the
leg bend in a natural way, and not backwards. After I was pleased with the
position and rotation of the bones, I have used the ‘Bone Tools’ interface to
mirror the left leg on the X axis and thus create the right leg. However,
because the bones were mirrored, they were now flipped inwards. Quickly
reversing the sizes of each separate bone solved the issue. The legs were then
linked to the root (pelvis) using the link tool.
The
arms were realised in a similar way to the legs, starting with the clavicle, shoulder,
forearm and ending with the wrist bone. I have then copied the shoulder,
forearm and wrist bones twice. The first copy was then reduced in size and recoloured
as it will be used for IK controls. Similarly, the other copy was enlarged and
it will serve purpose for FK controls. All three bone chains are overlapping,
as seen in the picture below.
 |
| (Red - Roll bones; Blue - FK bones; Yellow - IK bones) |
The
bone segments (in red) on top of the forearm and the shoulder are ‘roll bones’.
They’ve been created by copying the shoulder bone and slicing it to about half
of the initial size using the ‘Refine’ tool under the ‘Bone tools’ menu. The
forearm roll bones were created exactly the same, but instead the bone had been
sliced into three equal segments out of which the ones closest to the wrist
have been kept. The roll bones will be useful at a later point during the
skinning phase in order to mimic the slight rotation of a real humans’ forearm
(and wrist) bone(s) and the skin deformation that comes with it. Upon
completely structuring one arm the other one was mirrored into place by the
same methods used for the legs. The clavicles were ultimately linked to the
chest spine bone.
Due
to mirroring the right leg and arm, the X and Z axis rotations were inverted,
which meant that the two arms were rotating in contradictory directions. In
order to solve the issue, I have selected the mirrored arm and leg and while
only affecting the pivot points, I have given them a relative world rotation of
180 degrees. Now the limbs were rotating in the same direction, two by two.
After
finishing the arms, I moved on to the hands. I have used the same methods as
the ones explained above. Each hand has 5 fingers comprising of 3 bones each,
and a nub on the tip of each finger. The palm is a bone on its own to which the
5 fingers are attached. The hands were then linked to the wrists using the link
tool.
References:
Bhati, Z., Waqas, A., Karbasi, M. and Mahesar, A.W., 2015. A Wire Parameter and Reaction Manager basedBiped Character Setup and Rigging Technique in 3Ds Max for Animation. International Journal of Computer Graphics & Animation, 5(2), pp.21–36.
Autodesk 3ds Max Learning Channel, 2012. Creating a Skeleton in 3ds Max - Part 4 - Arm Bones. Available
at: <https://www.youtube.com/watch?v=W13OxAM8F8w&list=PLnKw1txyYzRlxh1-BT4CifPXC5TBg2vUd&index=8&t=0s>
[Accessed 28 Nov. 2018].
George
Maestri, 2016. How to Properly Rig Your Characters for Animation | Hierarchies
and Character Animation | Peachpit. [Learning] How to properly rig your
characters for animation. Available at: <http://www.peachpit.com/articles/article.aspx?p=483793>
[Accessed 27 Nov. 2018].


Comments
Post a Comment